

I made my first woven bench over two years ago now, and it continues to be a statement piece in my home. I had got an old coffee table at the local thrift store for $5 (!!!) and it was begging to be beautified. I simply love how the woven seat turned out, and continue to get compliments on it. The best part is that I used canvas drop cloth for the fabric, which is very durable, very affordable, and blends with many different decor styles.
I have made FOUR woven upholstered benches now, and each time I get a little better at recording the steps to share. Now that I have done it a few times, I am happy to share so you can create your own stunning masterpiece. It is very easy to do, even with no sewing skills. And the best part is that it is super cost-effective! Your biggest investment will be your time & patience. A high-end, unique look that is easy AND affordable? What are you waiting for!?


I am sharing a written tutorial (with photos) here, but if you prefer to watch videos then you can find those on my Instagram. Look for Woven Bench 1+2 and Woven Bench 3 in the saved highlight bubbles. As you progress through those slides, I share more tips & details.
For the purpose of this tutorial, I am skipping over all of the prep & painting steps taken for the body of the bench, and straight to the upholstered top.
Supplies
-
fabric of your choice - I recommend canvas drop cloth - durable & cheap! Find at any hardware store.*
-
1” upholstery foam*
-
quilt batting*
-
poly fill*
-
stapler (highly recommend an electric one) & staples (I used 5/16”)
-
straight edge
-
scissors or rotary cutter (with cutting mat)
-
sewing machine (you could also use iron-on hem tape)
-
plywood (only if you need to create a new top)*
-
Scotch Guard fabric spray
*all sizes and amounts will directly correlate to the size of your bench. I used about 1.5 lbs of poly fill for the bench I share in this tutorial, which measures 26 x 15”.
Note
There has been one main difference between all of the benches I have done. One had an attached top with a lip, one had an attached top with NO lip, one had a removable top, and one had a removable hinged top. That slight difference resulted in a slightly different step for each - but otherwise it’s all the same. The only thing you need to adjust for is the size of your bench seat.
Attached top, with lip: I stapled everything directly to the underside of the lip. I often flipped the whole bench upside down to work on it. This works, but the end result isn’t as polished looking and is harder to maneuver while working. *You will have to be more precise in your measurements & cutting if this describes your bench, as you only have the small lip overhang to work with.
Attached top, no lip: I created an entirely new top from a piece of plywood. I cut the plywood 1” larger than the bench seat so that it created a ½” lip on each side when attached. This was much easier to work on, and had the added benefit of looking much more polished at the end because everything was sandwiched between the new top & the original. I attached this new top to the original bench (when completely finished) with wood glue & screws (from underneath).
Removable top: The easiest one! Simply remove the top, follow the below steps, and reattach.
Removable hinged top: Same as above, but I marked my hinge holes with a nail through each layer of fabric so I could easily attach the hinges again later. You will see these throughout this tutorial, but is unnecessary unless your top is also hinged.
Other: Maybe your bench has a different top style than all of these. You might have to get creative to brainstorm how exactly you want to attach everything, but I believe in you!
Let’s Get Started
First up is what I call the “base coat”. This adds uniform softness & colour to the bench, below the woven feature. This makes sure that if there are any gaps in the weave, that you’ll see the correct colour beneath.
-
Cut a piece of upholstery foam to the size of your bench seat. Or if facing an apparent foam shortage like I discovered locally, you can use an old mattress foam topper. I purchased one at Jysk for $25 on clearance - twin size so it is more than enough for several benches!
I recommend using 1” foam to add nice padding - I have tried both thinner & thicker but prefer 1” personally. Depending on the thickness of your foam you can use scissors, a utility knife, or even your nice bread knife (cuts like butter!). You can use a spray adhesive to hold it in place on the seat if you like, but I did not find it necessary.
-
Cut quilt batting to size, leaving yourself at least 4” of extra on each side. This does not have to be exact, just enough to wrap around the sides of your foam and underneath the bench seat.
-
Finally, cut a piece of your fabric at least 4” larger on each side. I used an electric stapler and 5/16” staples to attach. Wrap your materials taut around the foam and seat, and fold the corners nicely. Staple away! This gives a uniform colour to show through any natural gaps that may occur during the weaving process.


Above shows the stack of fabric, batting, and foam. Next is with the bench seat on top (foam is hidden underneath). How it looks on the bottom after being stapled, and the last photo is the seat flipped over. Mine looks a little wobbly on the edges thanks to the ridges in the mattress foamie, but that is all hidden underneath the weaving.
Next Up…
Now we need to create and sew our fabric tubes. The great news is you do not need any sewing skills to accomplish this, as long as you can sew a relatively straight line you’re good to go. If you don’t have access to a sewing machine, you could use iron-on hem tape instead.
We do need to do a little math first, though. Personally, I like the look of tubes that are at least 4” wide. Any narrower and they are hard to stuff, and they do become thinner when stuffed so keep that in mind. I will share the dimensions that I worked with, and you can then make adjustments as necessary for your own bench.
On this particular bench, I used 4.5” as my tube width. All my dimensions are pictured below, you will of course have to modify for your own dimensions. **Rounding up in tube width or numbers will create some overlap for the flat tubes, but when they are stuffed & woven this will actually help eliminate gaps between the tubes.


To create a 4.5” tube plus the seam allowance, we need to cut strips of fabric that are 10” wide. The strip length will depend on your bench (+ foam), and add at least 10” to ensure you have enough length for the weave and for ample overhang. On one bench I tried to be conservative with the fabric and regret not leaving myself enough excess. Much easier to cut extra off at the end, than not have enough to work with - take it from me!
To mark my lines I used a long straight edge & a pencil or light marker, then simply cut with scissors. The wonderful thing about this project is that it doesn’t have to be perfect as it’ll all be hidden in the end! In fact, if you use a drop cloth like I did you will absolutely drive yourself crazy trying to make it perfect - the seamed edges are not at all straight. I did end up buying a large cutting mat & a simple rotary cutter to make the job easier, but those are not necessary.
You should have one set of strips for the length of your bench, and one set for the width. Your exact number will depend on the size of your bench.

Sew It Up
Now that all your strips are cut, time to sew! Again, you do not need amazing skills for this. A rough job is perfectly fine because the seams will all be hidden forever. You honestly don’t even need to use matching thread because it’s all hidden. A sewing project I can manage, yay!
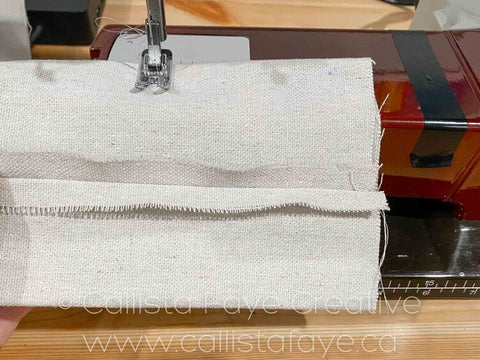
Fold your strips in half lengthwise (hotdog style). Drop cloth is sturdy enough that I didn’t need to pin it, but you can if that helps. Sew together, leaving about a ½” seam. This doesn’t have to be exact, just worked well for my novice skills. I actually put a piece of tape on my sewing machine that was 4.5” away from the presser foot, to help me keep a consistent line. Alternatively, close your tubes with iron-on hem tape.
Important to note, it is absolutely fine to leave this seam on the OUTSIDE of your tube. You do NOT have to flip your tubes inside out to hide the seam. It is much easier to stuff the tubes without the pesky seam & threads in the way, AND the seams are totally hidden forever once everything is woven & fastened.

Once you have sewn the length of each tube, sew ONE end closed, perpendicular to your first seam. I’ll attach a photo of what I mean. You want your first seam to be on the bottom of the tube, not an edge. This is VERY important so that your seam stays hidden when you go to weave the tubes. Sew this second seam several inches away from the end of your fabric - this end is the part that will wrap underneath your seat and you don’t want stuffing there.

Similar to my photo above, you should have a bunch of floppy tubes and messy seams. Which again is TOTALLY fine - as this will all be hidden. Drop cloth unravels a lot, I just pulled all the loose threads out.
Stuff It
Great! Now that the hardest part is done, the tedious part is next. Stuffing!
Figuring out exactly how much to stuff these tubes took a bit of trial and error, so I’ll do my best to share what I have learned so you don’t have to go through as many errors as I did. What I have found is that you want each tube to be about HALF stuffed, or just over. It will look a little underwhelming and floppy, but this leaves you the best workability for weaving. When they are stuffed too full, it is hard to weave and the tubes also lose a lot of their width, so you may have bigger gaps between each.
For the first bench I made, I used foam chips to stuff - but I would absolutely NOT recommend this at all. It was challenging and messy to get the chips in the tube, and they did not fall down uniformly like I expected them too. I also feel that they have lost their fluff over a couple years of use now. I absolutely recommend using poly fill to stuff with.

Take about a handful of stuffing and push it in as far as you can reach. I found a good rhythm was shoving in about 4 handfuls, then using a long dowel or broom handle to push all the way to the end of the tube. Now just keep repeating that, careful not to tamp down the stuffing too much with the dowel. You can shove the stuffing around from the outside to ensure it stays relatively uniform. Remember, we are NOT trying to fill these completely. Just over half stuffed, so they look fluffy but still have a lot of flexibility. You can see where my hand is that there is a lot of give, but they don’t look empty either.


On this bench it took around 1.5 lbs of poly fill, and about 45 - 60 minutes to stuff all of the tubes. Put on a good show and get to work!
And finally…
Okay - the “worst” of it is done. Now comes the easy, and rewarding, part!
Staple your tubes to the bottom of the seat. I line the short seam up just in from the edge, make sure the tubes are evenly spaced, and staple. If your seat is facing down, you also want your long seams facing down. That way they will be totally hidden once you flip it over & start to weave. You probably will have some overlap on the flat part of your tubes, that is a good thing! It will bring the stuffed tubes closer together and help eliminate gaps.
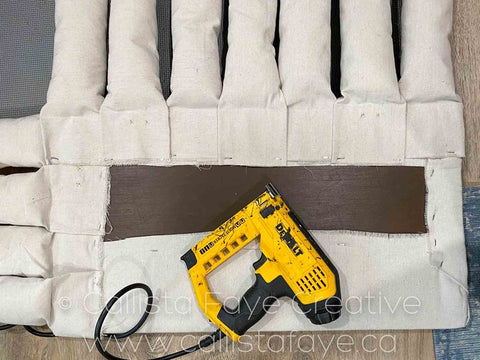

The seams are exposed now, but once you flip the tubes over & begin to weave they will be totally hidden forever.
If you have never woven, it’s just an over-under pattern you follow. Make sure to alternate whether you start with over or under to maintain the basket-weave effect. Roughly weave the entire top, but don’t worry if tubes close to the edges come undone. You want to do a rough weave first (as opposed to fastening all the short tubes straight across & then weaving the long tubes through) because you want to make sure you have enough slack in the tubes to give is a nice puffy look.

On the first bench I made, I fastened the long tubes first and then the short ones. I now recommend fastening the short ones first and then the long ones, to give more control over how they lay as you work along the bench.
Start with the middle tube, pull it taut-ish, and staple under the opposite side. How tight you pull is up to your preference, you will be able to see the effect tighter & looser has. Too tight will flatten your tubes, and too loose will let them shift around. Work your way out from the middle to the sides. Make sure they go straight across and don’t end up angled. You can also remove any extra poly fill so that you don’t end up with stuffing underneath the seat.
Now repeat with the long tubes. It’s much easier to control how they lay once the short tubes are already stapled in place.
Cut off any excess.


Now that the weaving is done, you’re ready to reattach the seat to your bench legs (if applicable). You should have a visually stunning & very comfortable woven seat!


I do seal my upholstery with Scotch Guard, but this step is optional and is totally up to you. It is easier to spray before reattaching the seat, however you can also use a garbage bag to protect your bench legs from overspray. I have had a drop cloth woven bench in my front entry for over two years now, and only cleaned it once. It looks fabulous, and we live on an acreage so it gets used & abused daily. I am so happy with it, which is why I keep making these woven benches!


Related Posts

Silverware Care

Transforming an $8.00 Thrifted Desk!
